


Laboratory design mistakes happen. Unfortunate, but they happen. Some are mechanical, structural, or and even code. But for the purpose of this blog, we are focusing on the furniture decisions. Casework specified against a millwork standard instead of a lab standard. Countertops designed with details the material can’t fabricate. Fume hoods that won’t fit through the corridor on delivery day. Also, benches sized to the day-one equipment list and rebuilt when the second generation of instruments doesn’t fit.
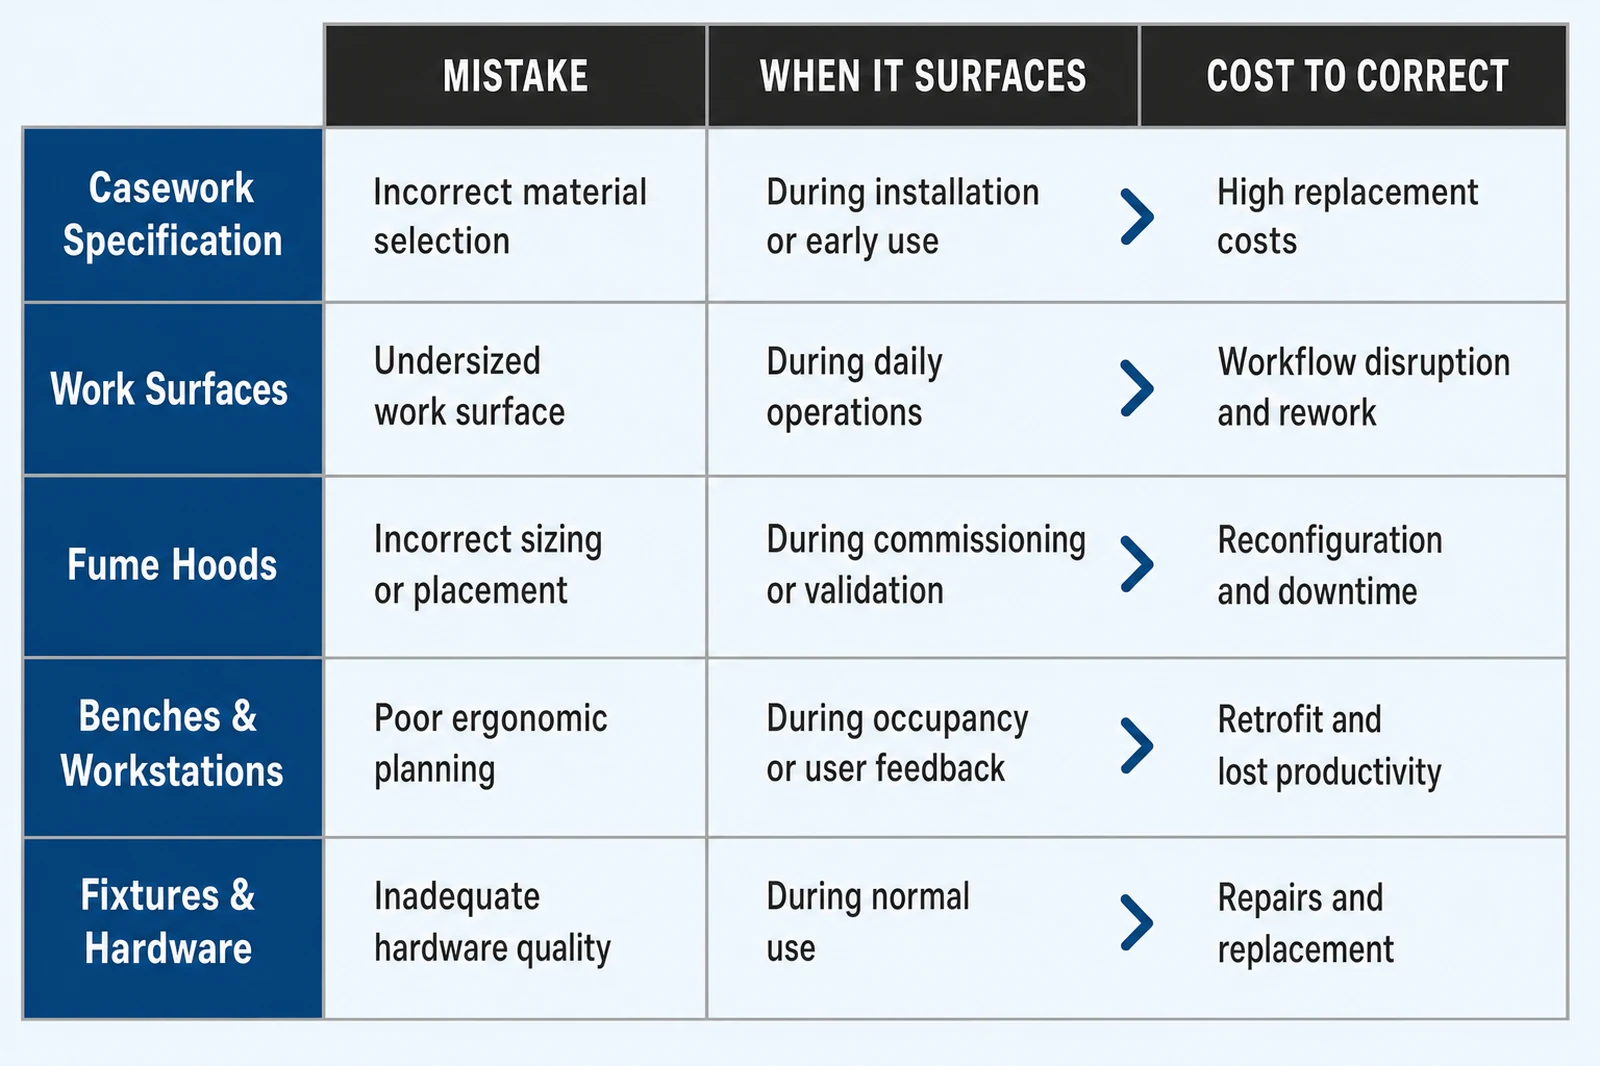
This guide collects the ten laboratory design mistakes that most often trace back to a furniture, casework, or fixture call. They’re grouped by the decision phase where each one originates. Every pair references the standard that governs it. SEFA 8 governs casework, SEFA 3 governs work surfaces, and ANSI/AIHA/ASSP Z9.5 governs hood placement. Then the NIH Design Requirements Manual covers flexible bench planning. Catching one of these on a 50 percent DD set is a redlined callout. Catching it after punch list is a change order.
Casework specification mistakes
Casework is the largest line item in most lab furniture packages, and the decisions made at DD (spec language and how the product physically arrives at the room) often echo through the next fifteen years. Two mistakes recur.
Specifying casework without a SEFA 8 reference
A cabinet run built to residential or commercial millwork standards is not the same product as a cabinet run built to SEFA 8. SEFA 8 defines the structural, chemical resistance, and hardware cycle-life tests that a lab-grade cabinet passes. When a spec references generic millwork or omits the standard entirely, the bid opens to vendors whose product survives a house or a corporate office but not a chemistry bench. The difference shows up in the first year: drawer slides that bind under a full load, door hinges that develop play, and finishes that stain from routine reagent contact. A one-line reference to SEFA 8 in the Division 12 spec closes that door before bid.
Not planning for how the furniture actually gets into the room
Lab furniture is bigger and heavier than office furniture. The path from the loading dock to the lab is rarely reviewed at design. Fume hoods often arrive at 6 to 8 feet wide and 5 to 7 feet tall. Epoxy countertops ship in slabs up to 96 inches and weigh 11 pounds per square foot. Biosafety cabinets and glove boxes commonly exceed the 36-inch standard door opening. If the delivery path includes a 32-inch corridor door, a freight elevator with a shallow cab, or a tight stair landing, the install crew may have to disassembly the furniture onsite. Sometimes a temporary wall opening gets cut in and re-finished. However, all that adds additional costs that probably weren’t foreseen and thus budget is exceeded.
One expensive version of this mistake is a fume hood delivered to a building with no freight elevator, when the lab sits two or three floors up. A 6-foot hood that would roll off the truck and into a ground-floor lab in an hour becomes a stair-carry. The install crew disassembles the hood on the loading dock, carries the pieces up flight by flight, and reassembles on the lab floor. That work adds labor hours. It may require a second trip if the crew hits a fit issue mid-carry. It often adds a rigging line item that wasn’t in the base bid. So confirm door widths, ceiling heights, elevator dimensions, and turning radii along the full delivery path at 50 percent DD. Then ask the furniture manufacturer for crated shipping dimensions and any stair-carry surcharge.
Work surface and countertop mistakes
The countertop is the single hardest-working piece of furniture in the lab. Two selection mistakes account for most of the early-life failures we see.
Sizing the countertop material for average chemistry, not worst-case chemistry
Laboratory countertop selection often anchors on the chemistry the lab expects to run every day. However, a single monthly exposure to a stronger reagent can still damage the surface. Phenolic resin performs well against most acids. However, concentrated hydrofluoric acid and hot chromic acid can attack the resin binder. Epoxy resists a broader range of chemicals. It is also heavier and more expensive. Stainless steel handles heat and impact well. It reacts to chloride environments and bleach. The SEFA 3 work surface standard publishes chemical resistance ratings by material. The right pick is the one that survives the worst chemistry the lab may run, not the median chemistry. Our bleach resistance in lab countertops guide walks through the trade-offs by material.
Designing epoxy and phenolic like solid surface
Epoxy resin and phenolic resin are not fabricated the same way solid surface countertops are. Specs written from a residential or commercial millwork template often treat them as if they were. Epoxy is cast in molds and ships in finite sizes, commonly up to 96 inches by 72″ inches and phenolic can go up to five feet by ten feet. That means long bench runs will have visible field joints, and those joints need to fall where the design allows. Sinks in epoxy are separate molded units that drop in or undermount. They aren’t seamlessly integrated the way a solid-surface sink can be. Phenolic ships in sheet form and doesn’t come in sink form at all. So any sink on a phenolic bench can either be a polypropylene, stainless or epoxy unit set into a cutout.
Both materials are heavier and less forgiving than solid surface. Seams can’t be thermally welded to invisibility. Edges have a defined thickness. Thermal expansion behavior is different. If the drawings show a continuous 20-foot epoxy run with a seamless integrated sink, the fabrication release comes back with joint locations and drop-in details the design didn’t anticipate. Confirm material limits with the furniture manufacturer before the countertop plan is finalized.
Fume hood and containment furniture mistakes
Fume hoods are the most expensive individual furniture line item and the most frequent source of post-occupancy complaints. Two mistakes account for most of them.
Placing the hood where architecture wanted it, not where airflow needed it
Hood placement often gets compromised in the last round of layout revisions. A program need pushes a hood toward a door, an air diffuser, or a heavily traveled aisle. Z9.5 recommends a minimum 5-foot buffer from doors and 3 feet from occupied aisles. It also recommends locating supply diffusers so they don’t blow across the hood face. Catching this on a 90 percent set is much cheaper than balancing the room after installation. The only late-stage fix is often a diffuser relocation or a door swing change.
Choosing a benche hood when the workflow needs a walk-in or distillation hood
The default 6-foot bench hood covers most lab work. However, distillation racks, large glassware trains, and floor-mounted equipment need a walk-in hood or a distillation hood. If a spec defaults to bench hoods to control the furniture budget, and the lab later needs a walk-in, the retrofit is expensive. It includes the hood swap, the sash mechanism, the exhaust ductwork, and the base cabinet reconfiguration. So name the tallest and largest workflow the hood must accommodate at programming.
Bench and workstation mistakes
Benches and workstations look interchangeable on plan and behave very differently in use. Two selection mistakes recur.
Committing to fixed casework when the workflow calls for mobile or modular furniture
Some labs expect to reconfigure benches between projects, or rotate instrument suites annually. They pay a real cost for fixed casework tied to plumbing, gas, and electrical hardpoints. The NIH DRM recommends that flexible-use benches use mobile or modular systems. Those systems use stubbed-out utility drops on a modular grid rather than fixed hardpoints. The trade-off is a modest per-linear-foot cost premium at bid time. In return, the lab saves substantial cost every time it reconfigures. Our modular lab furniture guide walks through the workflows that reward mobility.
Under-planning ADA workstations in the casework layout
The 2010 ADA Standards for Accessible Design govern accessible workstation dimensions inside a lab. Common misses include a countertop height that exceeds the 34-inch maximum. Another is a knee clearance zone that is less than 27 inches high and 30 inches wide. A third is a reach range that exceeds 48 inches to the highest operable control. Retrofitting an ADA-compliant station into a designed casework run typically requires removing a base cabinet and replacing it with a knee-space configuration. That change affects storage counts and adjacent sink placement. Plan at least one ADA station per lab from schematic forward. This keeps the fix in the drawing set, not the change order log.
Also be sure to check out our ADA Lab Design guide for more details on this subject as well.
Fixture and hardware mistakes
Lab fixtures and hardware are the smallest line items in most furniture packages and the most common source of nuisance failures. Two mistakes account for most of them.
Skipping BHMA grade language on hinges and drawer slides
Casework hardware fails long before the casework itself does. A cabinet built to SEFA 8 but shipped with residential-grade drawer slides or two-knuckle butt hinges will show failures within months in a working lab. Specifications should reference SEFA 8 in full. They should name the BHMA grade for hinges and slides (Grade 1 for high-use benches). Our Division 12 spec guide covers the hardware language that closes this gap at bid.
Placing emergency fixtures behind casework or in blocked travel paths
Emergency showers and eyewash stations follow ANSI/ISEA Z358.1. The standard requires a compliant fixture within 10 seconds of unobstructed travel (approximately 55 feet) on the same level. It also requires no doors or obstructions in the path. If the casework layout is finalized before the emergency fixture routing is confirmed, the fixture can end up behind a cabinet run, behind a supply cart storage zone, or in a corridor a later bench installation blocks. So run a travel-path review during commissioning. Then keep a per-lab activation log after occupancy.
The takeaway
None of the ten furniture mistakes above are surprises during design review. Each one has a well-established specification, a first-party standard, and a documented cost of correction. The pattern is that they can sometimes make it through design review because they look like small decisions relative to the pillars, the roof, and the mechanical system. They aren’t small once the lab is occupied. Catching them at the first instance, is cheapest form of insurance a furniture package can carry.
Let’s Design a Functioning Lab Together
If your a architect or lab planner and wanting to avoid some of these mistakes or even some not mentioned that you’ve experienced in the past when it comes to lab furniture, reach out via our contact page. We’re happy to work through you to create a seamless interior lab design.
OnePointe Solutions Lab Design Team