



Most lab redesigns don’t start with a broken system. They start with a lab manager standing in a room that used to work. They see two techs bump elbows at a fume hood, watching centrifuges live on a rolling cart because there isn’t a casework run left with an outlet, watching the safety committee open another finding — and finally saying out loud what everyone else has been thinking: this isn’t the same lab we designed.
So What Happened?
The design didn’t fail. Really, the lab changed. Instrument counts grew. Sample volumes doubled. A new compliance standard reshuffled what has to sit next to what. The five-foot aisle that felt generous when the lab opened now hides carts and cardboard because storage never scaled. That’s the moment a lab redesign becomes a decision, not a wish. Not the mention, it is a decision most lab managers only get to make once or even twice in a career.
In this guide, we wanted to give lab managers a defensible foundation when having to present to a director, a CFO, or a facilities committee. We’ll walk through the five signals that a design has quietly outgrown itself. Then we name the four changes that most often cause the drift. From there, we’ll lay out the three-tier decision framework — reconfigure, renovate, or relocate — and the language that turns a stressed workflow into a case leadership can act on.
A note on terminology before we go further. In this piece, lab table (bench) means a freestanding work surface on legs, movable by design. Casework run means a fixed installation of base cabinets with a countertop above them, typically anchored to a wall or set as an island. The two are not interchangeable in a redesign. You can reconfigure a lab table in an afternoon. A casework run generally cannot move that fast.
Signals a lab redesign is overdue
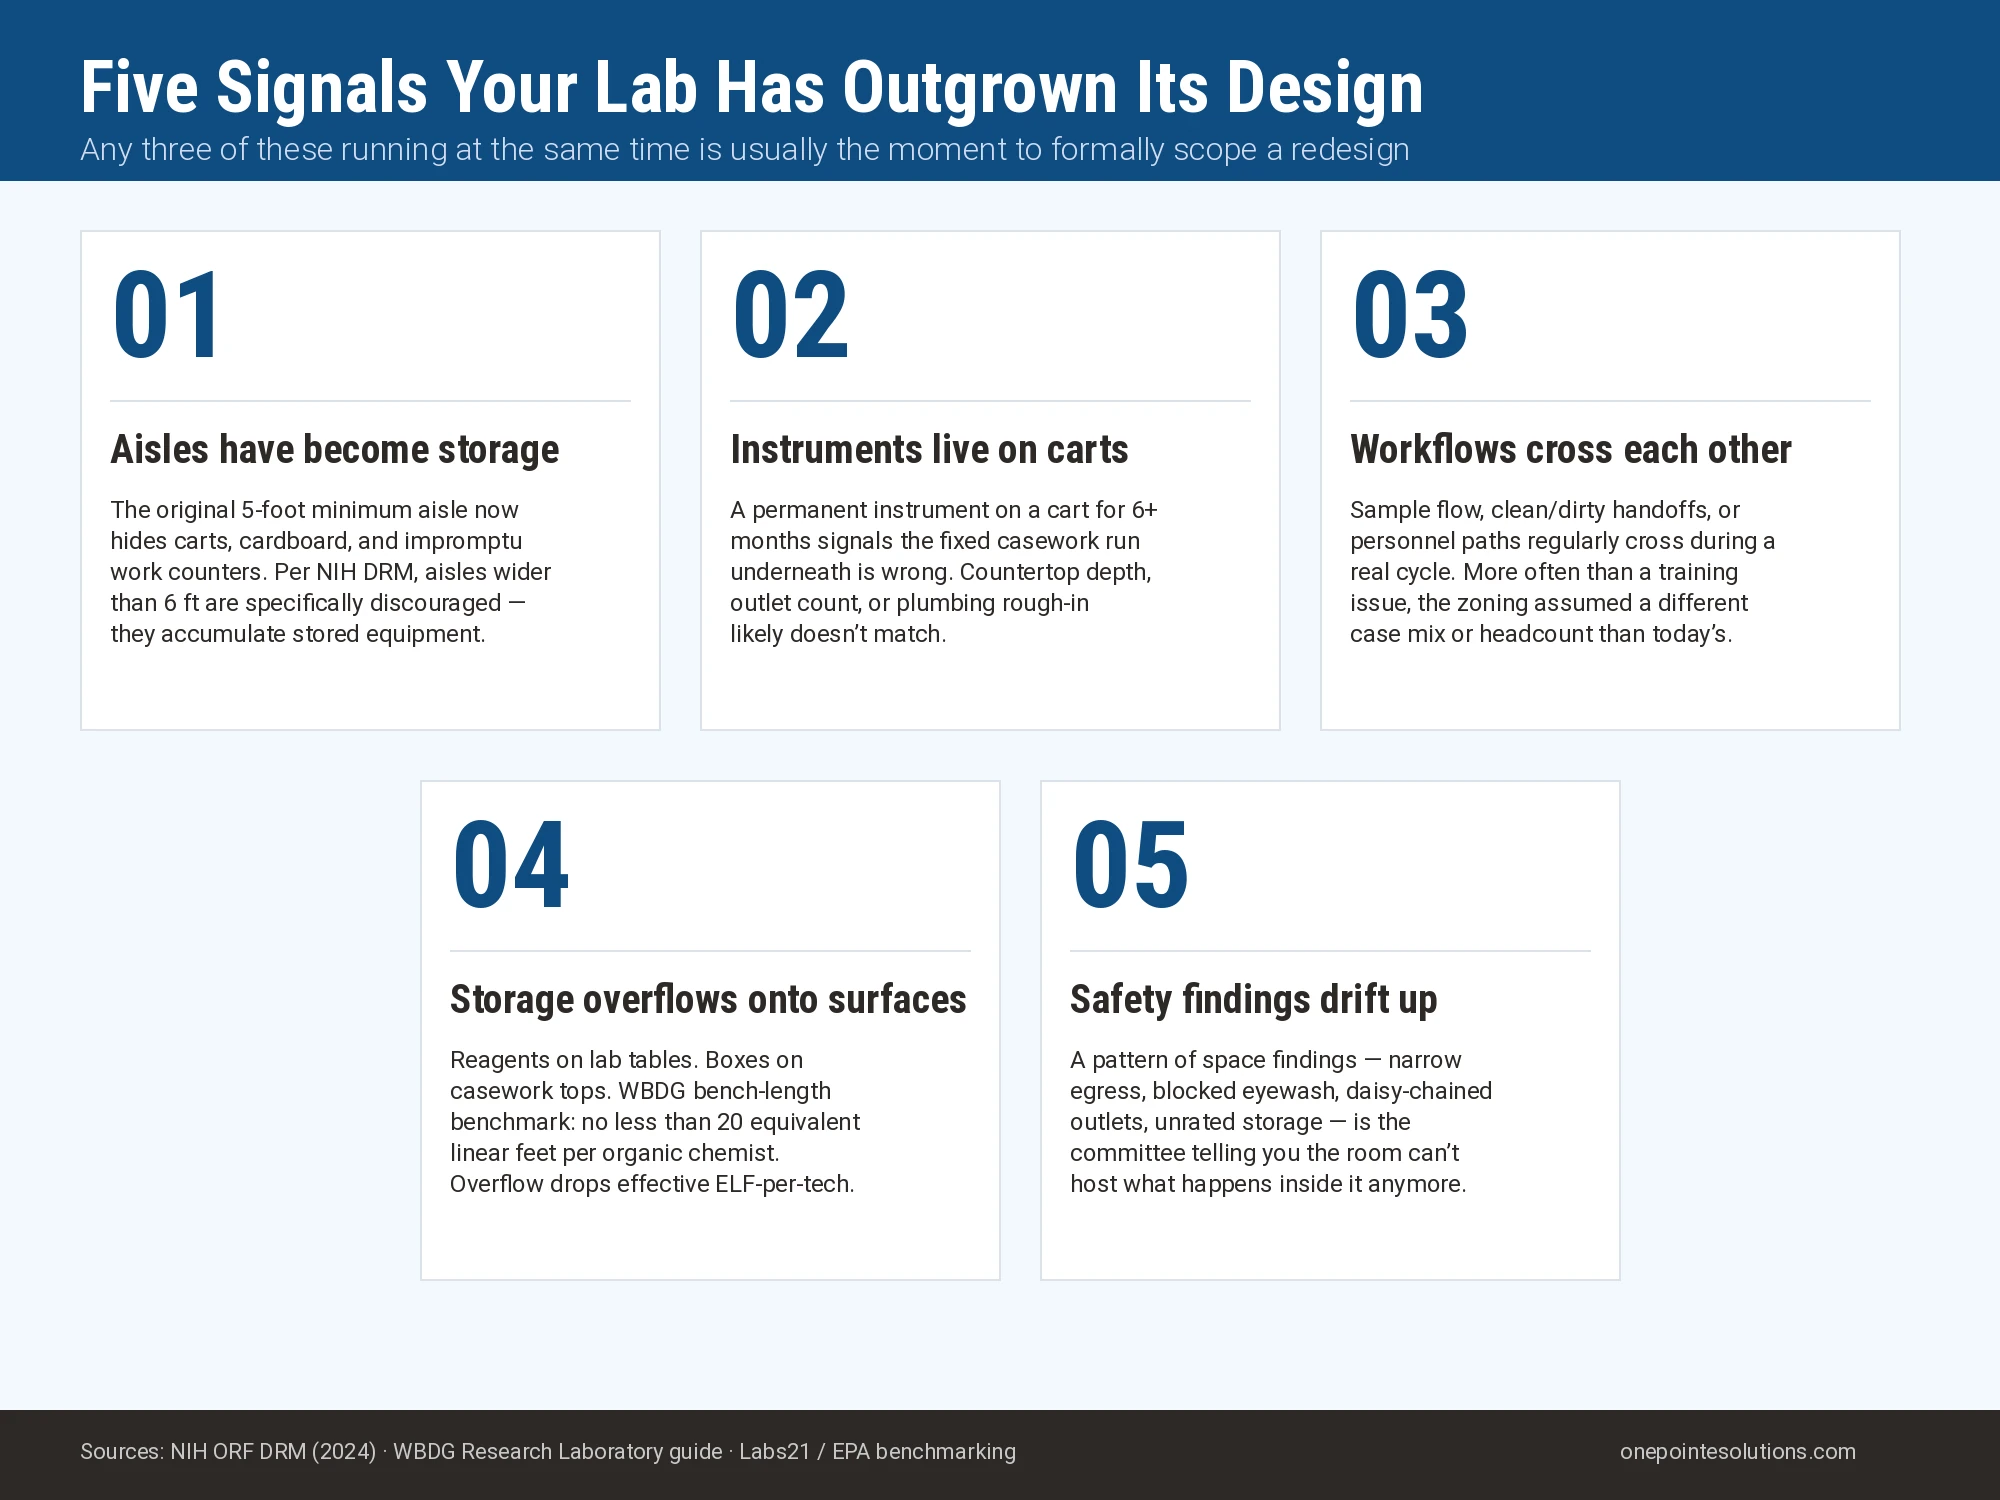
A lab design tends to fail gradually. The team adapts. Workarounds normalize. By the time the room feels wrong, the workflow has already been running around the layout for 12 to 24 months. Most of the time, five patterns show up together, and any three of them are worth pausing on.
Signal 1: aisles have become storage
Aisles have become storage. The NIH Design Requirements Manual sets 5 feet as the minimum aisle width. It specifically discourages aisles wider than 6 feet, because wider aisles tend to accumulate stored equipment, materials, carts, and impromptu work counters. If your original 5-foot aisle now hides a rolling cart, a stack of cardboard, or a decommissioned analyzer waiting for surplus, the aisle isn’t wide, the storage plan is. That is a design signal, not a housekeeping problem.
Signal 2: instruments live on rolling carts
Instruments live on rolling carts. Rolling carts are a design tool for genuinely mobile work: a portable analyzer that visits three benches, a shared timer. When a permanent instrument (a centrifuge, a plate reader, a small analyzer) has lived on a cart for more than six months, the casework run underneath it is probably wrong. Either the countertop depth doesn’t fit, or the outlet count is too low, or the plumbing wasn’t roughed in for the drain the instrument now needs. Cart residency is a coded message that the fixed infrastructure no longer matches the instrument list.
Signal 3: workflows cross each other
Workflows cross each other. Watch the room for a full processing cycle. Look for sample flow, clean/dirty handoffs, or personnel paths that regularly cross. Common examples: a tech carrying uncapped specimens through the write-up area, gowning and de-gowning at the same door, or dry work positioned downstream of wet processing. When these show up, the layout is fighting the workflow. Sometimes this is a training issue. More often it is a signal that the original zoning assumed a different case mix or headcount than the lab actually runs today.
Signal 4: storage overflows onto occupied surfaces
Storage overflows into occupied surfaces. Reagents on lab tables. Boxes on top of casework runs. Personal effects on the fume hood ledge. Once storage capacity runs out, the lab absorbs the overflow onto the work surfaces themselves. That reduces effective bench-length availability. The WBDG benchmark for organic chemistry, for example, calls for no less than 20 equivalent linear feet of bench per technician. If your ELF-per-tech dropped because the surface got colonized by storage, the lab tends to feel crowded even when the headcount hasn’t changed.
Signal 5: safety-committee findings drift up
Safety-committee findings are drifting up. A single finding is a finding. A pattern is different. Egress narrower than 5 feet. Chemical storage in an unrated cabinet. An eyewash station now blocked by equipment. Extension cords daisy-chained because the outlets ran out. That pattern is the safety committee telling you the room can no longer host what happens inside it. If the findings are about the space rather than the practice, the room is the problem.
Three of these five, running at the same time, generally means the design has been outgrown. It doesn’t tell you what to do yet. It tells you the decision is on the table.
Why a lab redesign becomes necessary: four common drivers
Naming the cause matters as much as naming the symptom. In our experience walking existing labs before renovation, four changes are behind most cases of a good design going wrong. Most lab managers will recognize which one applies within a minute of thinking about it.
Driver 1: instrument density crept up
Instrument density crept up. The lab was designed around a specific instrument list. Then a new analyzer arrived. That began the first bottleneck. Next a small centrifuge, a dedicated fridge for a new reagent kit, a printer, a barcode station. Every one of them was defensible on its own. Together, they consumed the design margin the original layout carried: empty countertop space, spare outlet capacity, the unused casework run depth. The lab is doing the same kind of work, just with more machines. Instrument density can double in five years without a single new headcount.
Driver 2: sample volume grew faster than the workflow
Sample volume grew faster than the workflow. A design that comfortably handles 40 samples a day generally handles 80 poorly. The equipment isn’t too small. The buffer areas (staging, holding, log-in, reporting) simply fit the original throughput, not today’s. Doubling volume tends to double the number of open specimens in the room at once. The room’s safe capacity for open specimens is a fixed number, set by the casework layout. When volume grows past that number, the lab either breaks workflow rules or spills onto surfaces meant for something else.
Driver 3: headcount, shift structure, or role mix shifted
Headcount, shift structure, or role mix shifted. A single-shift lab and a two-shift lab don’t need the same write-up space, gowning capacity, or personal storage. Even at the same daily throughput, a shift change puts more people in the room at once. Adding cross-trained roles, embedded QC personnel, or dedicated informatics staff often means the design’s assumptions about who works where no longer hold. This one is easy to miss because it doesn’t feel like a “lab change”, it feels like an HR change.
Driver 4: compliance regime shifted underneath the lab
Compliance regime shifted underneath the lab. A common cause in clinical and regulated environments. A new CAP checklist item. An updated NFPA 45 interpretation. A Joint Commission finding. A state-level building code adoption. A revised ADA reach range that now applies to a bench that used to be exempt. The room hasn’t changed. The rules have. And because compliance findings usually apply on next inspection rather than at rollout, the lab can carry a latent problem for a year or more before the finding lands. If your last three cited findings are all spatial rather than procedural, the compliance regime has probably shifted past the design.
These four causes are not mutually exclusive. A common pattern is two of them running at once: instrument density climbing while a compliance standard tightens, or headcount growing while sample volume grows. Naming both causes matters because they suggest different responses. A pure density problem may be solvable with reconfiguration. A compliance-plus-density problem generally isn’t.
Lab redesign decision matrix: reconfigure, renovate, or relocate
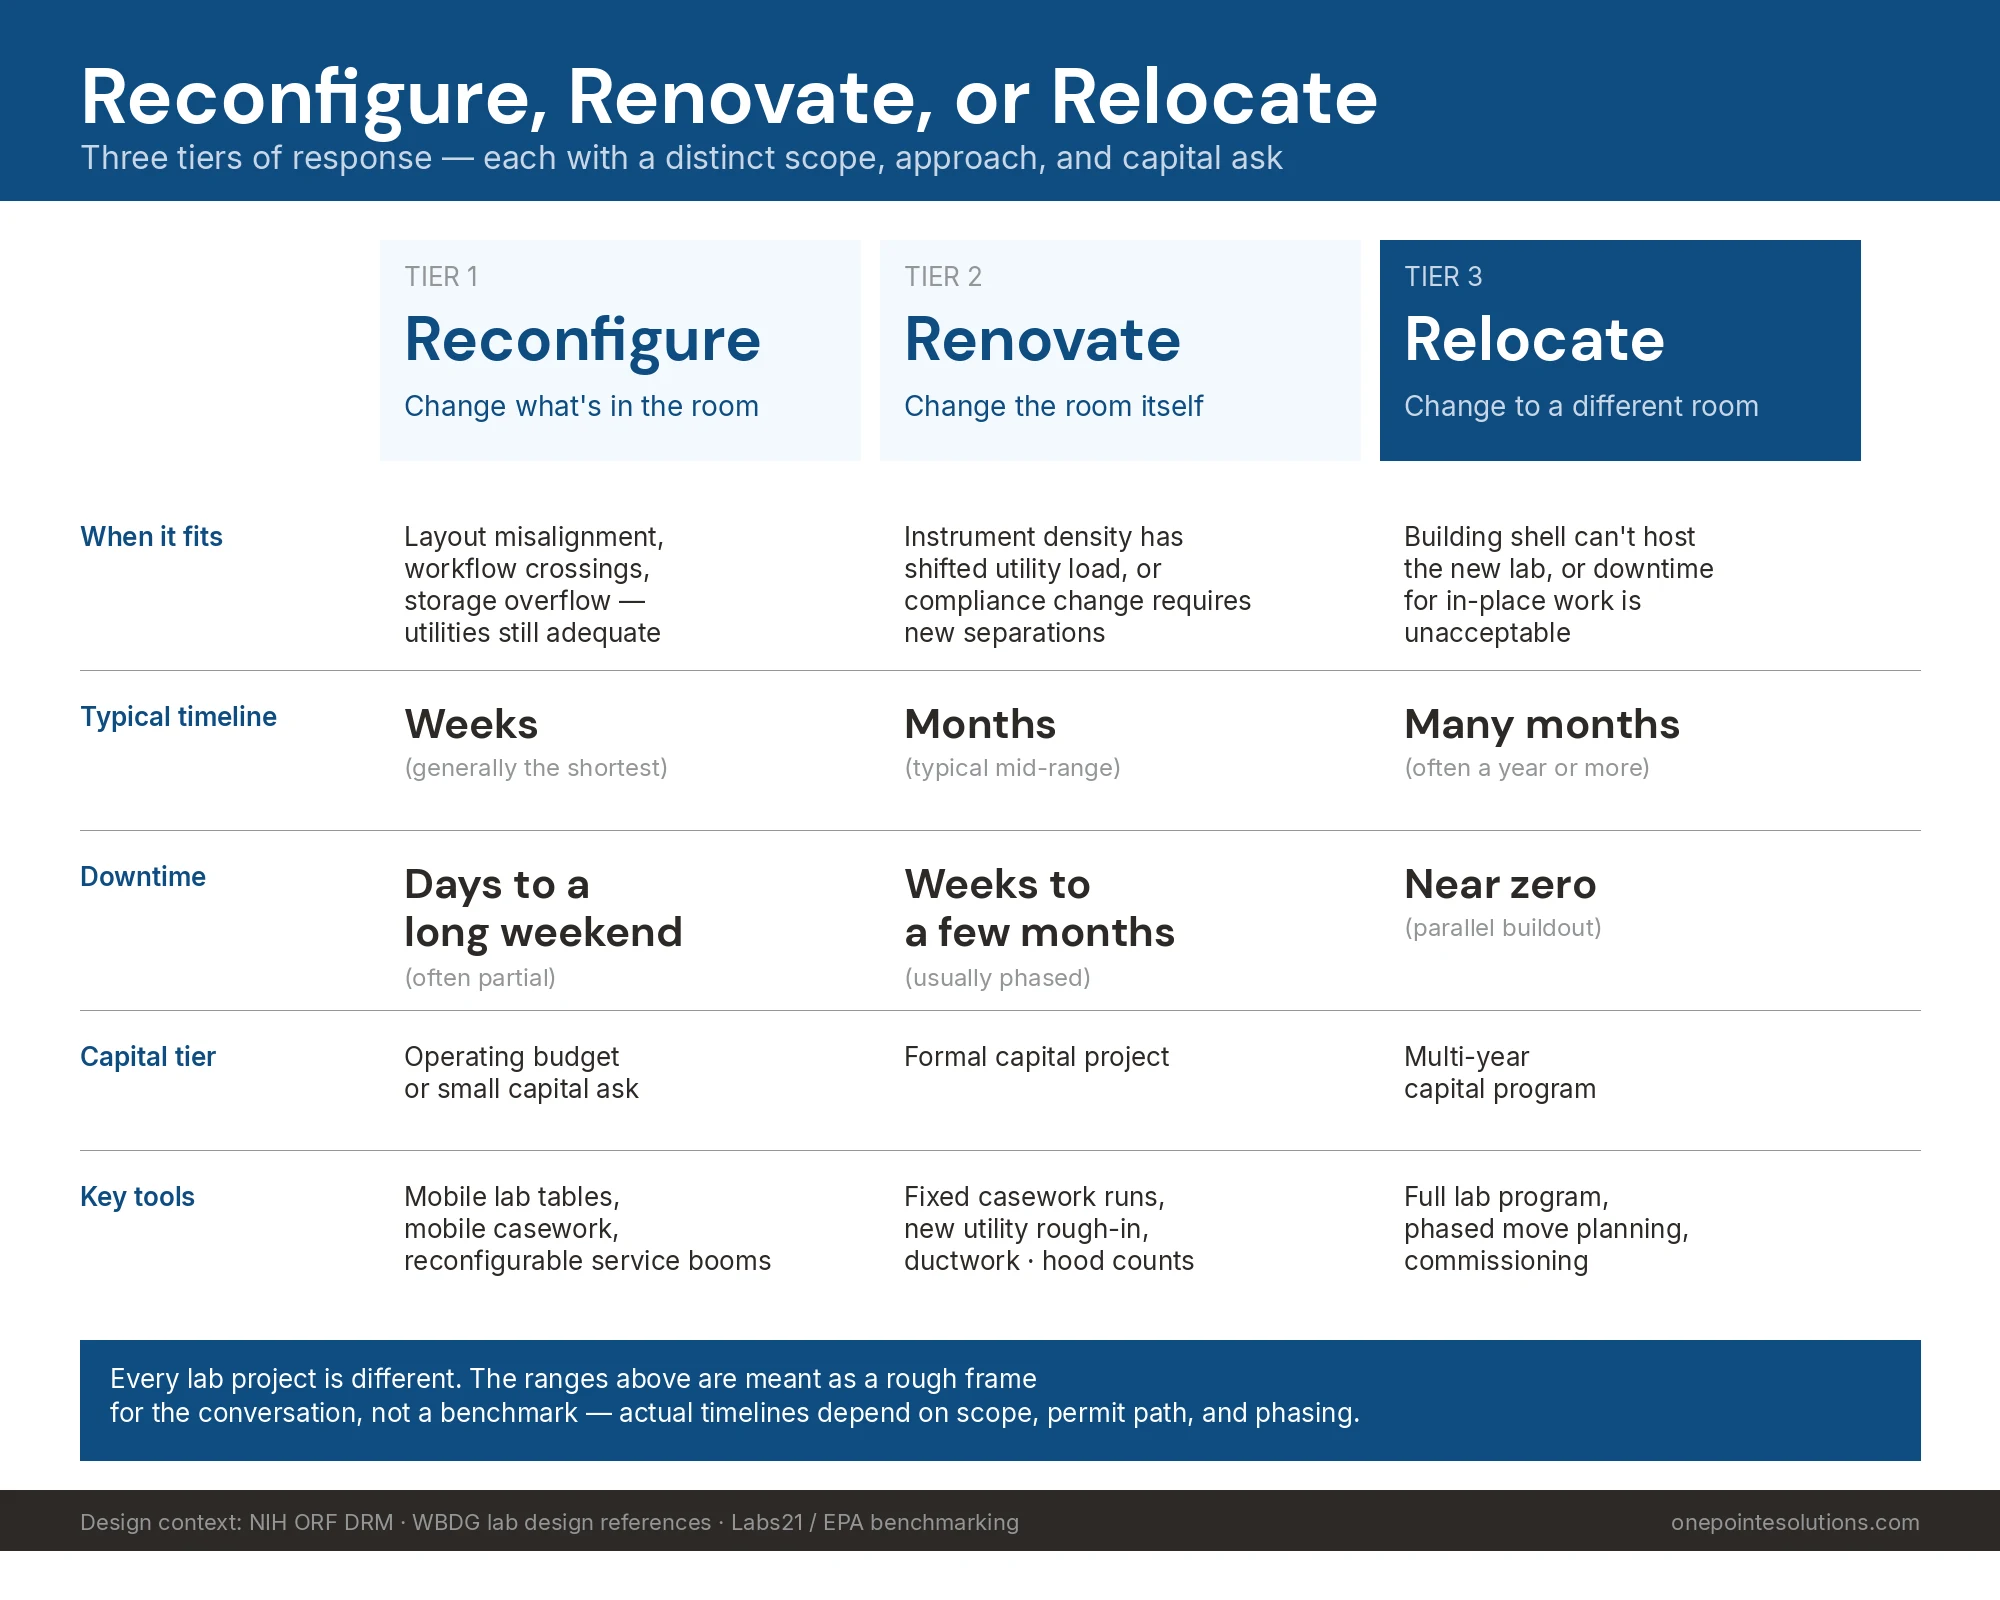
Once you can name the signals and the cause, the response usually falls into three tiers. Each has a distinct scope, budget range, and downtime profile. Framing the decision this way tends to help leadership because it separates a small operational fix from a capital project.
Tier 1: reconfigure
Reconfigure. Change what sits inside the room without changing the room itself. This works when the signals point to layout misalignment (workflow crossings, instrument-on-cart residency, storage overflow) but the underlying utilities, egress, and compliance envelope are still adequate. Mobile lab tables, mobile casework, roll-under casework runs, and reconfigurable overhead service booms are the tools here. In our project data, a full reconfiguration on an existing lab tends to run 8 to 16 weeks with 1 to 3 weeks of partial downtime. The capital ask usually sits in the “operating budget rounded up” range rather than a formal capital request. Our mobile and modular casework guide covers the specification detail.
Tier 2: renovate
Renovate. Change the room. New casework runs, new plumbing rough-in, new electrical capacity, sometimes new ductwork or hood counts. This is where reconfiguration stops being enough — the walls stay, but nearly everything inside the walls changes. Renovation generally fits when instrument density has fundamentally shifted the utility load, when a compliance change requires new separation or new finishes, or when the lab needs different kinds of workspace than the original program covered. Timeline is usually 12 to 26 weeks with 4 to 12 weeks of full downtime, and it is a formal capital project. Our 90-day pre-construction checklist is the companion piece for this tier.
Tier 3: relocate
Relocate. Change the room to a different room. This is the tier lab managers most often skip past — but for some situations, staying in place is the most expensive option. Relocation makes sense in three situations. First, when the building shell (floor-to-floor height, structural grid, mechanical shaft capacity) fundamentally can’t host the new lab. Second, when the compliance envelope requires separations the existing footprint can’t fit. Third, when downtime for in-place renovation exceeds what the organization can absorb. Timeline runs longer (typically 26 to 78 weeks), but downtime can drop to near zero if the team builds the new space out in parallel. Our laboratory relocation guide details the move-vs-renovate decision.
A common miscalculation: teams choose a renovation because it “feels smaller” than a relocation. Then they discover that the ductwork won’t fit inside the existing ceiling depth, or that the utility shaft can’t carry the new hood count. Renovation costs then approach relocation costs while retaining the downtime penalty of in-place work. A short feasibility study — often 2 to 4 weeks of engineering — usually pays for itself several times over. It sorts Tier 2 from Tier 3 before you write the capital ask.
For a specifier-level look at what typically drives project cost, our older but still-referenced cost of renovating a lab post covers the line-item breakdown that most CFOs want to see before signing anything.
Building the lab redesign case leadership can approve
The final step is translation. The signals and the tier decision are lab-manager language. The approval happens in CFO language — return, risk, and time-to-value. Three moves generally get the case across.
Move 1: quantify the workaround tax
Quantify the workaround tax. Every workaround costs time. A rolling-cart instrument means an extra 30 seconds of setup per run. Storage overflow means 5 minutes of hunting for reagents twice a shift. A workflow crossing means a 15-minute detour every time a sample moves. Individually these numbers look small. In aggregate they add up fast. A 30-tech clinical lab losing 20 minutes per tech per shift loses the equivalent of one full-time position in unrecovered labor. Put that number on paper. Leadership responds to it the way it responds to headcount, because that’s what it is.
Move 2: price the compliance risk
Price the compliance risk. A pending finding is not free. A late-cycle CAP or Joint Commission finding that requires a physical fix often demands a compressed schedule. Compressed schedules generally cost 20 to 40 percent more than the same scope planned deliberately. The redesign avoids the premium. That’s a hard number a facilities lead or a compliance officer can second, and second opinions carry weight in capital review.
Move 3: anchor to energy and infrastructure
Anchor to energy and infrastructure. Laboratories tend to run 4 to 6 times the energy intensity of comparable office space, and older labs sit at the top of that range. The WBDG’s zero-carbon renovation guidance and Labs21 benchmarking both flag that fume hood sash management, biosafety cabinet efficiency, and lighting density are among the highest-leverage renovation targets. A redesign that lowers energy use intensity by 15 to 30 percent has a defensible payback story that a pure “we feel crowded” argument does not. If your organization has a carbon or sustainability commitment, tie the redesign to it.
One caution on all three moves. Leadership tends to discount lab-manager estimates that don’t cite a source. When we help clients build the case, we push for at least two of the numbers to come from a published benchmark (NIH DRM module dimensions, Labs21 energy intensity ranges, WBDG grossing factors) or from a documented internal audit rather than from lived experience. It is not that lived experience is wrong. It is that it is easier to challenge and easier to defer.
The lab redesign case that gets funded generally reads: here is what the room used to do, here is what it does now, here is what it needs to do in the next five years, here is the tier of response that gets us there, here is the number that makes it a business decision rather than a preference.
Download the Lab Redesign Manager Checklist
A printable, source-cited worksheet covering the five signals, four common drivers, three-tier decision matrix, and the three numbers that move budget conversations. Walk it with your architect, GC, or facilities lead before you commit to a capital request.
What to do this week
If any of this sounds like your lab, three concrete steps tend to move a redesign from wish to plan without committing to anything yet:
- Walk the room during a real processing cycle with a clipboard and no phone. Mark every rolling-cart instrument, every aisle obstruction, every storage overflow, every workflow crossing. This is your baseline.
- Pull your last twelve months of safety-committee findings and separate space findings from procedure findings. If space findings are 30 percent or more of the total, the room is a driver.
- Ask facilities for the last utility audit or, if none exists, request one. Instrument density and utility capacity are the fastest way to sort Tier 1 from Tier 2, and the audit is generally free to your lab.
The output of those three steps is enough to write a one-page lab redesign case for a feasibility study, which provides leadership with a better understanding and often what unlocks the next twelve months of planning.
— The OnePointe Solutions Lab Design Team