


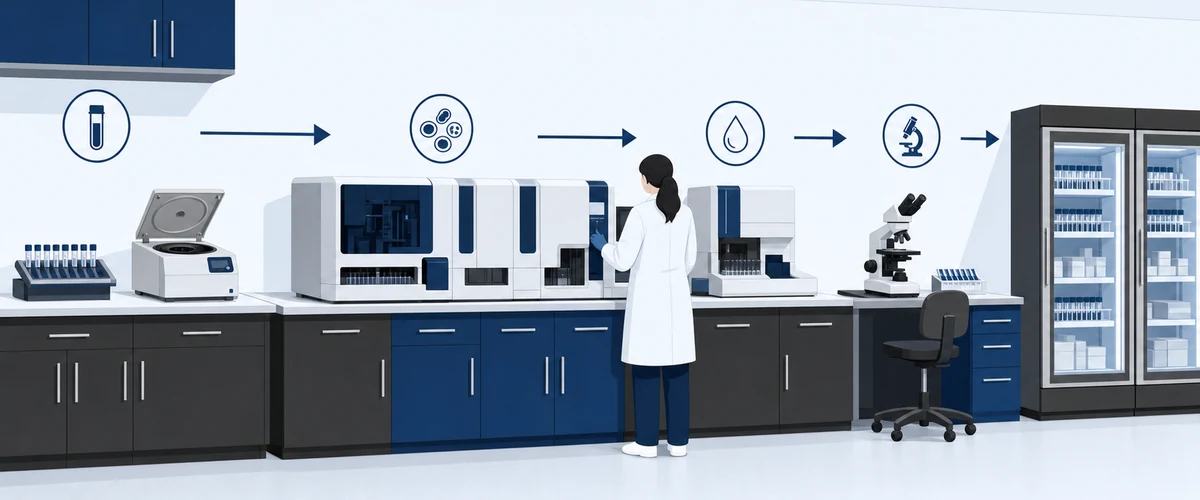
A hematology lab is one of the few clinical spaces where the physical layout can speed a result or spoil the specimen. Every complete blood count, coagulation panel, and manual differential runs through a defined sequence: collection, accession, analyzer, review, storage. The CAP checklist that governs the room is largely a set of time and temperature limits tied to that sequence. First, get the flow right, and the specimen is on the analyzer before it drifts. Second, get it wrong, and the lab burns hours on redraws that better hematology lab design would have prevented on paper. So the room plan and the CAP checklist are, in practice, the same document.
In short, this guide walks through what good hematology lab design actually needs: the zones that map to CAP-required workflows, the bench materials that survive daily disinfection, the biosafety layer OSHA and CDC require for bloodborne pathogens, and the small design decisions that keep coagulation samples inside their four-hour window.
What a hematology lab actually processes
First, it helps to be specific about what a modern hematology bench sees before laying out zones. The core workload is defined by the College of American Pathologists Hematology and Coagulation Checklist, which sets requirements for every stage from specimen quality to final QC review (CAP Hematology and Coagulation Checklist).
Most rooms handle four workflows in parallel. First, complete blood counts on automated analyzers. Second, coagulation testing on a separate coag analyzer. Third, manual differentials and reticulocyte counts at a microscopy station. And fourth, body-fluid or specialty analysis shifts between manual and semi-automated methods. In addition, each workflow has its own timing constraints. CAP requires CBC specimens to be mixed thoroughly and screened for clots, hemolysis, and lipemia before reporting (HEM.22000, HEM.22150, HEM.22200). Coagulation samples have strict windows. PT must be tested within 24 hours at 18 to 24 °C. Uncentrifuged aPTT within 4 hours. Unfractionated heparin samples must be centrifuged within one hour of collection (HEM.36940). Miss those windows, and the specimen has to be redrawn.
What that means for the room: hematology lab design has to move samples from accession to the correct analyzer without a detour, and the microscopy and coagulation zones can’t be so far away that a technologist ends up walking a specimen out of its stability window. The rest of this guide starts from that operational reality.
Sample stability windows drive the whole floor plan
These published stability windows generally govern how far a specimen can travel between accession and instrument. Every element of hematology lab design — zoning, bench length, aisle width — has to respect them, not the other way around.
| Test | Anticoagulant / tube | Room-temp stability | Refrigerated stability | Design implication |
|---|---|---|---|---|
| CBC with differential | K2/K3-EDTA (lavender) | ~24 hours | ~48 hours | Accession can sit briefly on a rocker; not the tightest constraint. |
| PT / INR | 3.2% sodium citrate (light blue) | ~24 hours | Not required | Coag bench near accession; centrifuge in-zone to avoid transit delay. |
| aPTT (non-heparinized) | 3.2% sodium citrate | ~4 hours | ~4 hours | Analyzer must be reachable in a short walk from the centrifuge. |
| aPTT (heparin monitoring) | 3.2% sodium citrate | ~1 hour | ~4 hours (after plasma separation) | Coag centrifuge and analyzer belong in the same zone as accession. |
| Platelet function testing | Sodium citrate | ~4 hours (assay-dependent) | Not recommended | Dedicated station near accession; avoid extended holding racks. |
| Reticulocyte count | EDTA | ~72 hours | ~72 hours | Looser constraint; can queue at analyzer bank. |
| Body-fluid cell count | Sterile / EDTA | ~1 hour (STAT) | ~4 hours | Body-fluid station adjacent to microscopy and BSC. |
Stability windows compiled from CAP Hematology and Coagulation Checklist HEM item ranges and standard manufacturer inserts. Always confirm against your specific instrument’s IFU.
Zoning the room around the CAP workflow
Workable hematology lab design tends to break into five zones. They don’t have to be walled off, most clinical labs run them as open bench sections, but each zone has different utility, ventilation, and material demands.
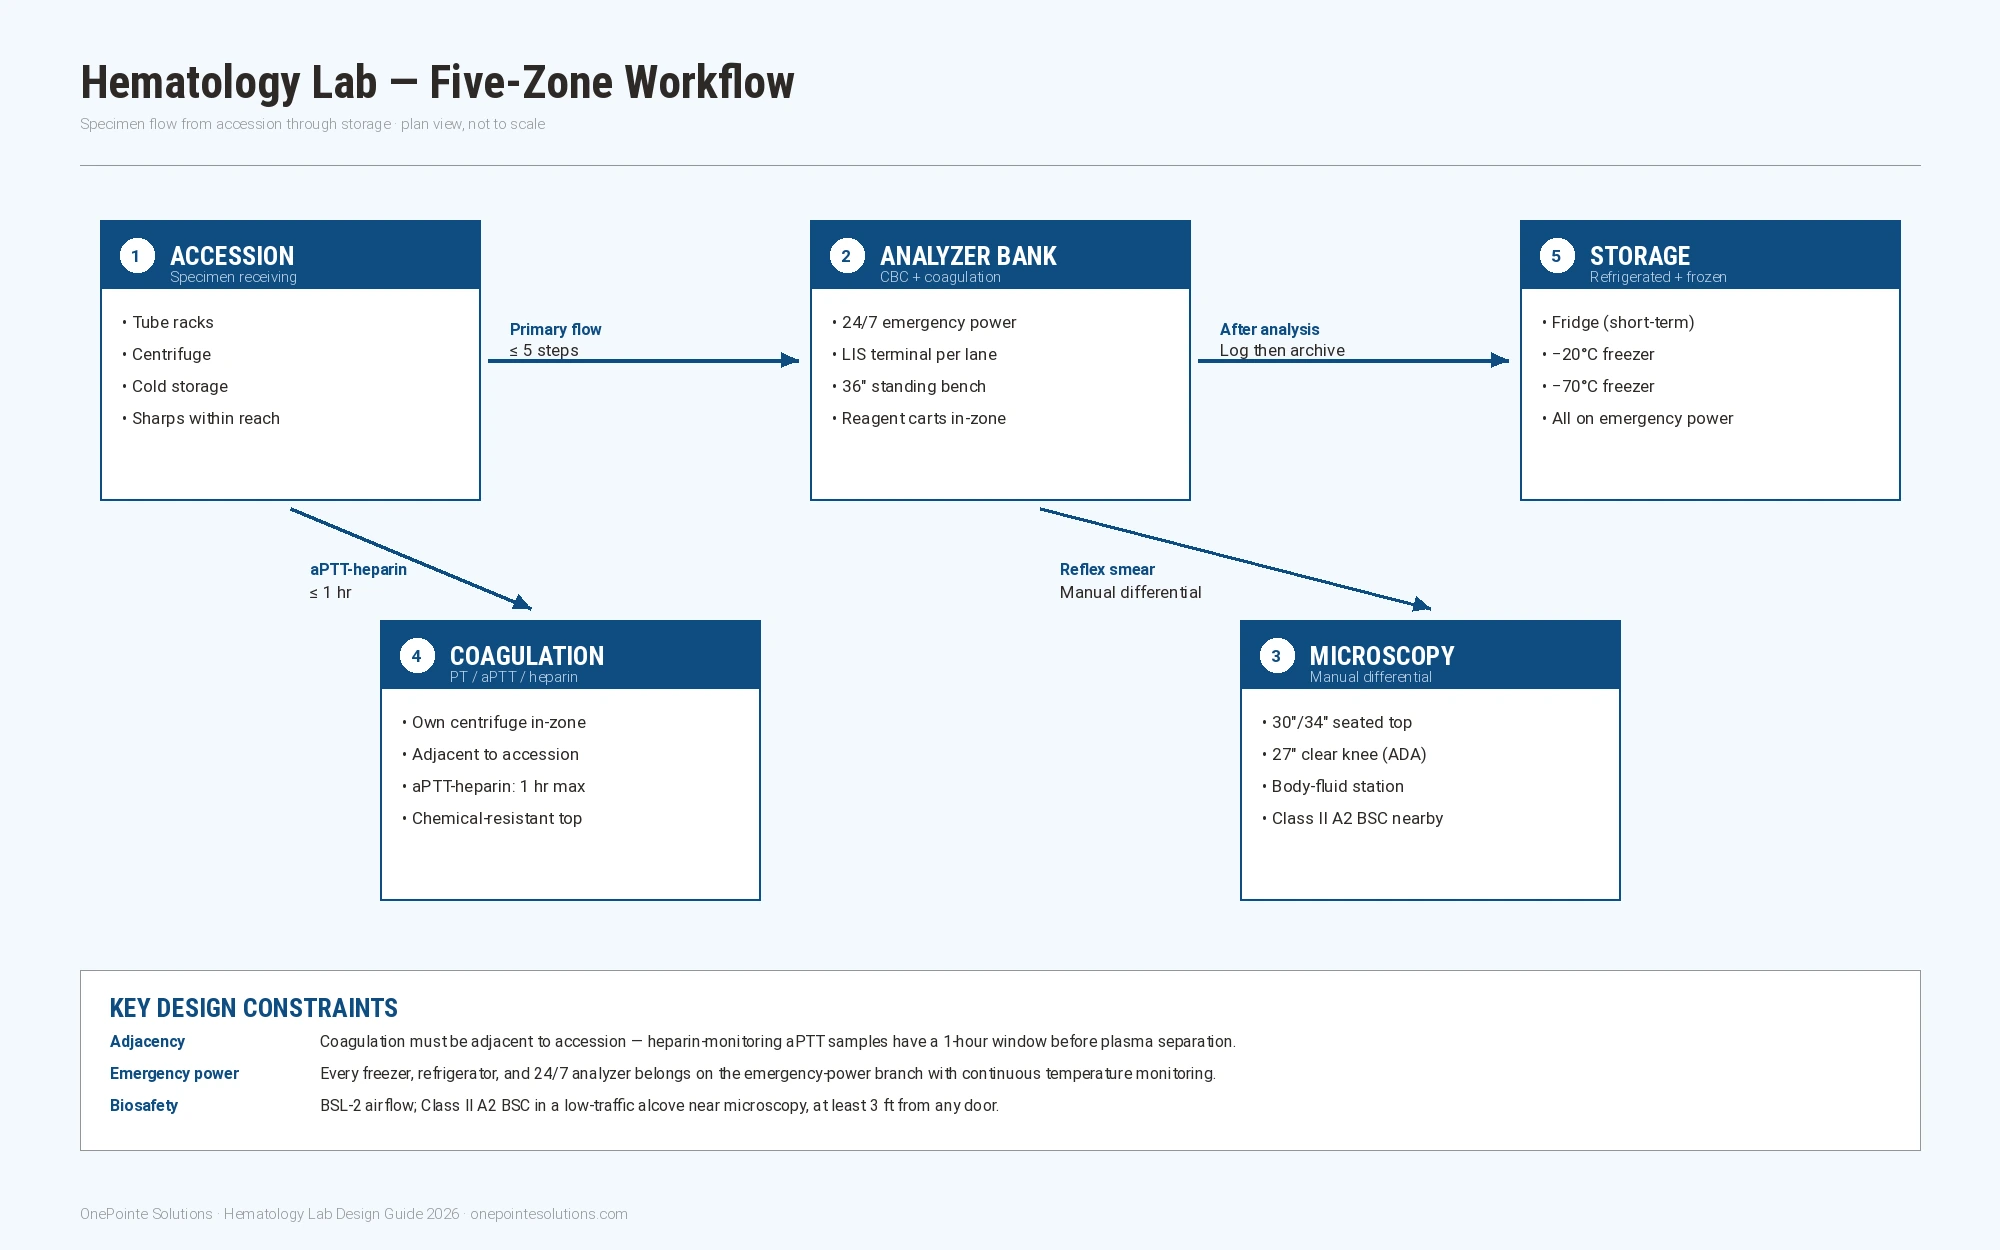
1. Specimen accessioning and receiving
In hematology lab design, this is where samples enter and get logged. The zone needs adjacency to the collection area or pneumatic tube drop, clear counter space for tube-check and centrifugation, and a small refrigerated storage unit for the samples heading to coagulation or hematology within the next hour. CAP item HEM.22000 requires enough automated mixing time to homogeneously disperse cells in a settled specimen. In practical terms, the accession bench needs room for a tube-rocker or gentle-mix rotator without crowding the workflow. Uncentrifuged aPTT samples must be tested within four hours at room temperature (HEM.36940). Therefore, the accession zone should also have a marked, timed holding rack. Notably, not a refrigerator, PT specimens should never be refrigerated during storage.
2. Automated analyzer bank
The CBC and coagulation analyzers are the throughput backbone. Two considerations dominate the analyzer bank. First, continuous power for instruments that run 24/7. Second, clearance for daily QC and periodic calibration verification. HEM.25850 calls for two different stabilized control specimens each 24 hours of analyzer use. HEM.25760 requires calibration verification at least every six months and after any major maintenance. That is a lot of QC time. Consequently, the analyzer bench needs its own reagent staging area and a dedicated LIS terminal. Technologists shouldn’t have to walk to a shared computer to release runs.
3. Manual differential and microscopy station
Even in a fully automated hematology lab design, manual differentials still happen. Any flagged automated differential can trigger a slide review under HEM.34200. Blood films should be examined under a 100× oil-immersion objective, and the checklist gives 300 fields as an example of adequate examination (HEM.34872). Reticulocyte counts need a minimum sample size of 1,000 RBCs (HEM.35300), and slides must be retained for at least one week (HEM.34450). In practice, those tasks reward a quiet, low-vibration workstation. Additionally, give it dedicated task lighting, a comfortable ergonomic chair, and enough bench depth for a microscope, a small reagent tray, and a slide-drying area within arm’s reach.
4. Coagulation testing zone
Coagulation is the most time-sensitive workflow in the lab. Beyond the PT and aPTT windows above, samples for platelet function studies must stay at room temperature (roughly 20 to 25 °C). They cannot be refrigerated, chilled, or frozen (HEM.38350). Platelet aggregation studies must be completed between 30 minutes and four hours after collection (HEM.38450). Therefore, the coag bench should sit close to accession. Additionally, it needs its own dedicated centrifuge with speed checked at least annually (HEM.32050). Finally, it needs a controlled ambient temperature in that 20 to 25 °C band — which sometimes conflicts with the cooler analyzer zone HVAC. Zone the two with separate thermostats if the budget allows.
5. Specimen storage and archive
The lab needs refrigerated storage for coagulation samples, a −20 °C freezer for platelet-poor plasma held up to two weeks, and a −70 °C freezer for plasma held up to 12 months (HEM.36940). Blood films should be kept at least a week (HEM.34450). Body-fluid smears at least a week (HEM.35642). Bone marrow reports and smears for ten years (HEM.36270). Long-retention storage doesn’t need to live in the bench zone. It can sit in an adjacent alcove or shared storage room. But the freezers should be on emergency power and have temperature monitoring with alarming.
Reference plan: what a 1,400 sq ft build actually looks like
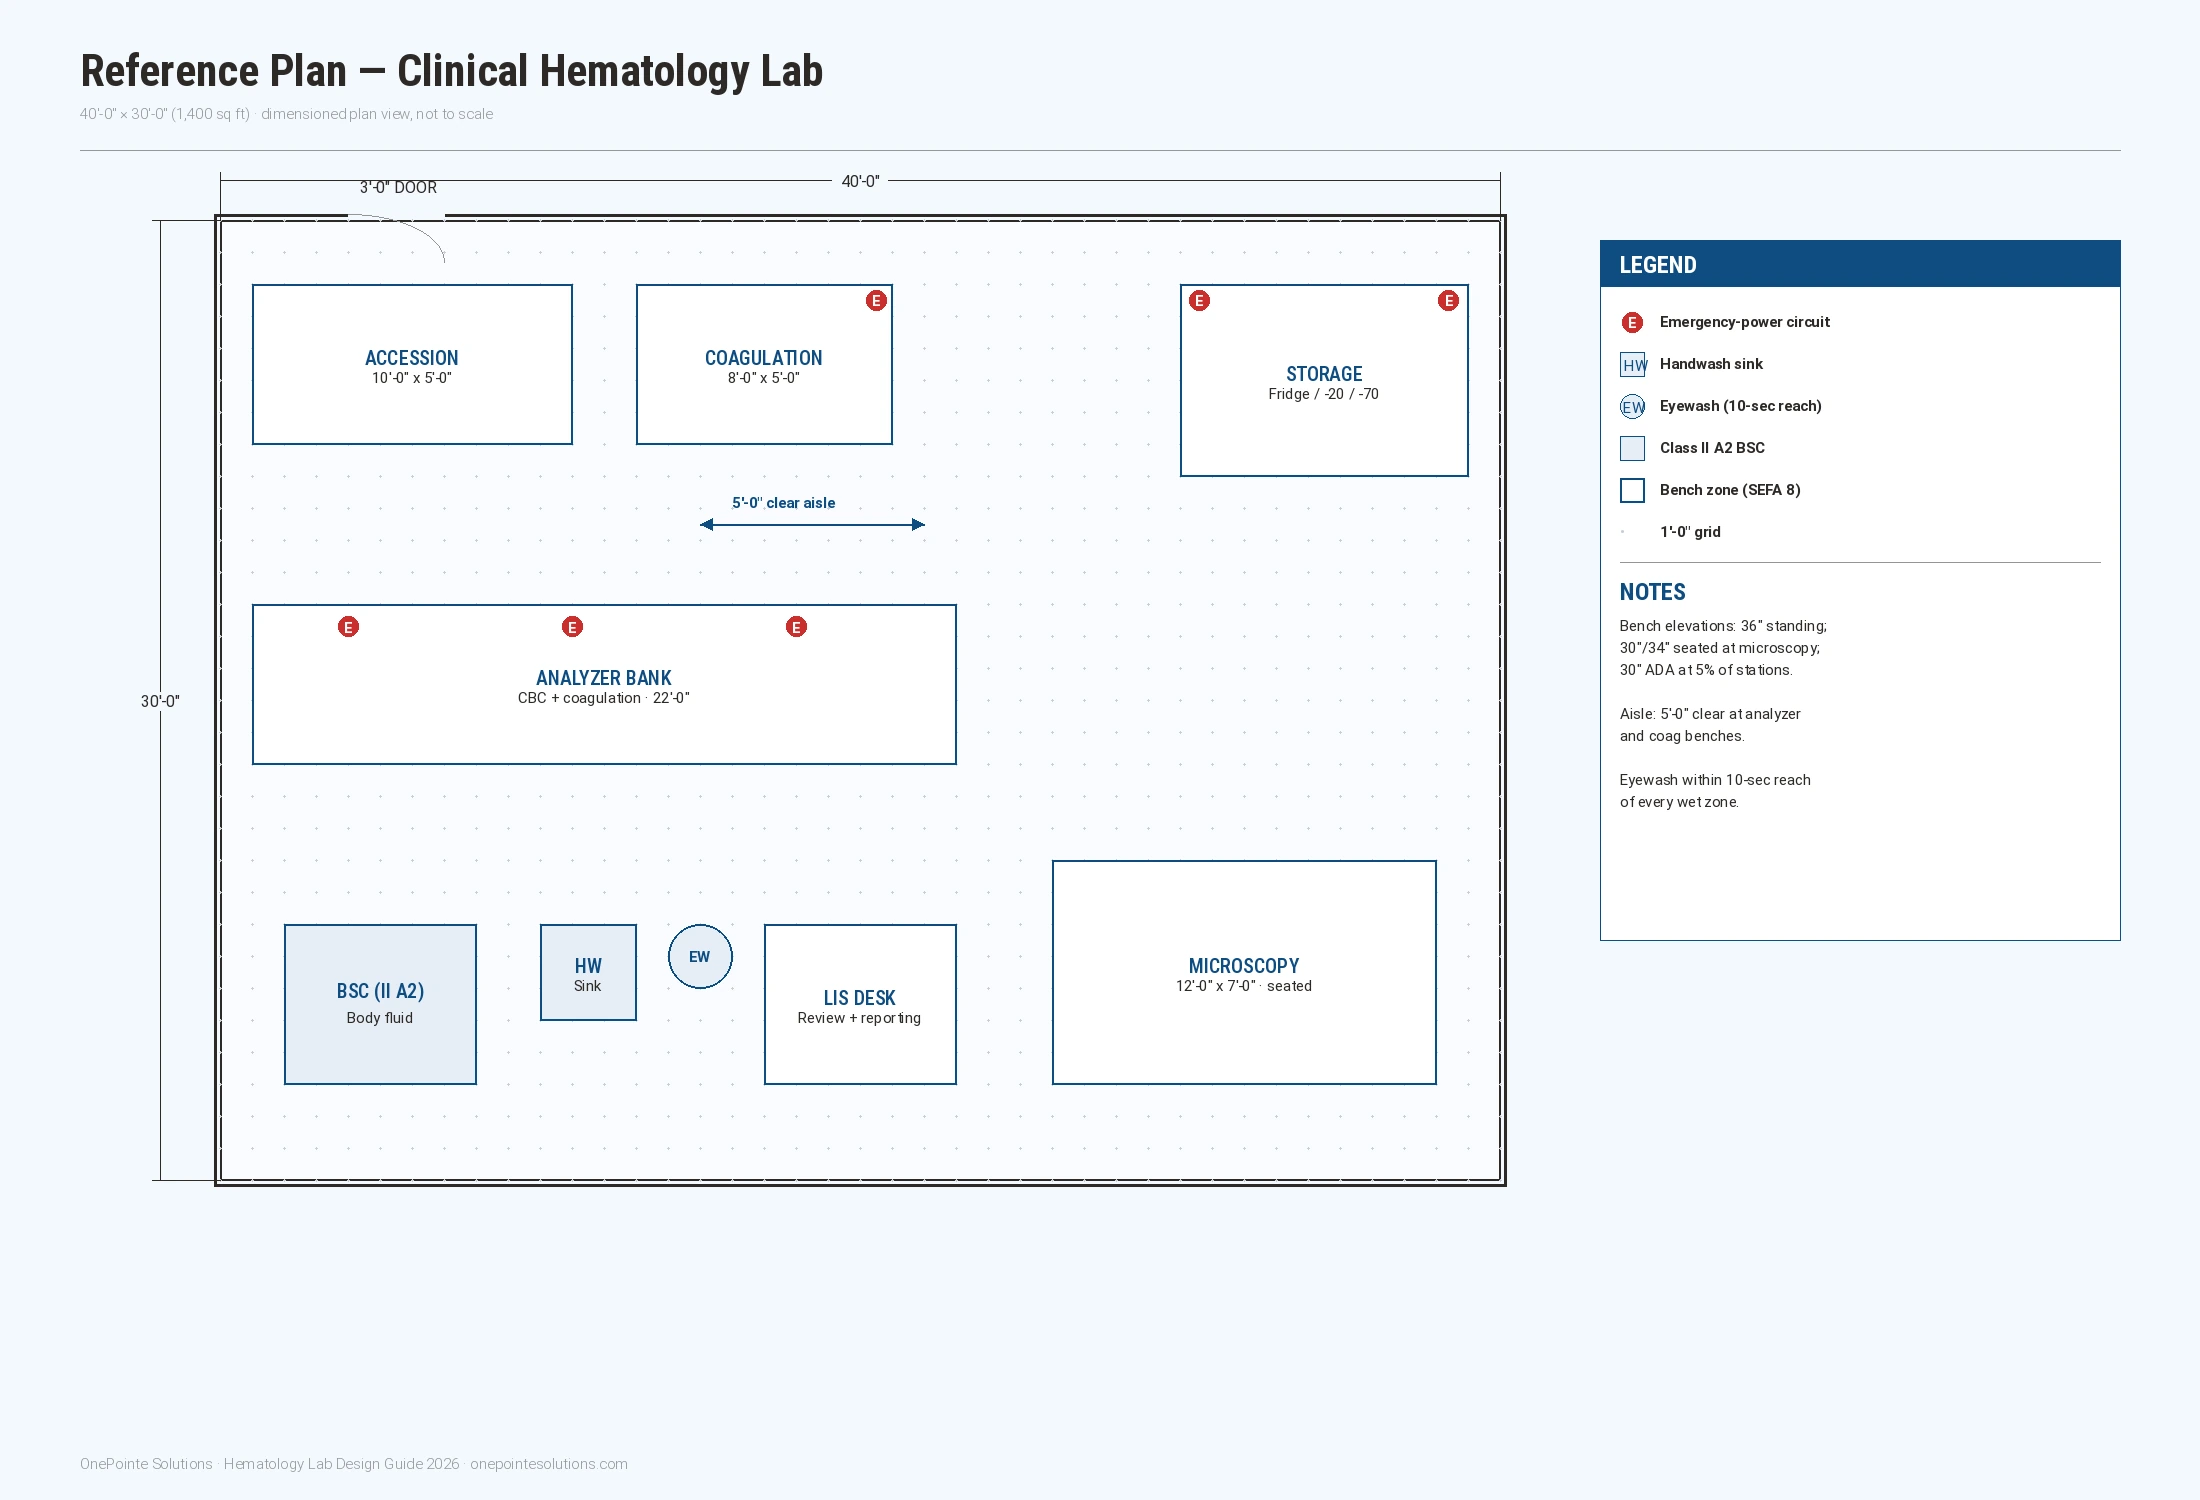
The diagram below is a dimensioned reference plan for a mid-sized clinical hematology lab design. It shows bench lengths, aisle widths, door swing, the BSC/handwash/eyewash cluster, and where emergency-power circuits belong. Treat it as a starting point for your own hematology lab design, not a finished spec. Real projects vary with instrument footprints and code jurisdiction.
Bench materials for hematology lab design
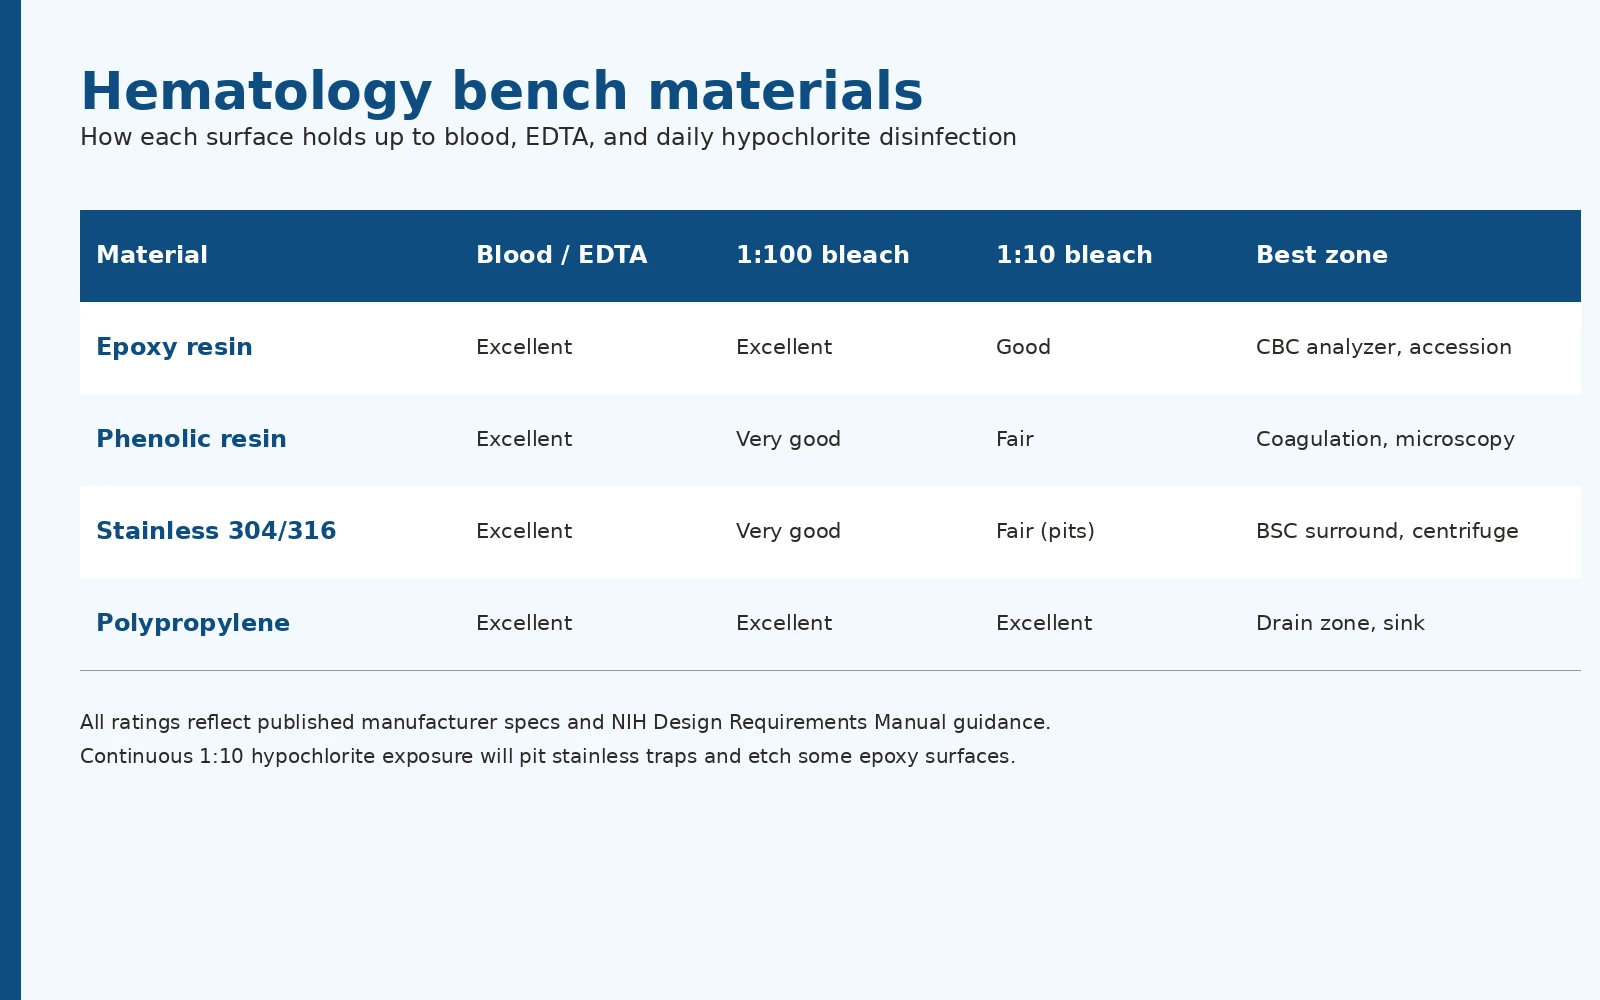
Hematology lab tables and workstations see blood, EDTA, sodium citrate, aqueous reagents, and daily disinfection with hypochlorite or an equivalent EPA-registered agent. In short, that combination narrows the material choice quickly.
Epoxy resin
Epoxy remains the default for clinical hematology bench tops in most facilities. It shrugs off blood, EDTA, citrate, and routine 1:100 hypochlorite wipe-downs. Its non-porous, monolithic surface disinfects reliably. The NIH Design Requirements Manual lists epoxy among its approved bench materials for chemical-service and clinical benches. However, one caveat: epoxy tolerates household-strength bleach well but shows measurable degradation under continuous or industrial-strength exposure. Our recent bleach resistance guide covers that in detail. If the SOP calls for daily 1:10 bleach kills, spec accordingly.
Phenolic resin
Phenolic works well for coagulation and dry-analyzer areas where the primary exposures are aqueous reagents and light disinfection. It is lighter than epoxy and easier to fabricate around if needing to perform infield cuts. It also stays dimensionally stable for microscopy benches where vibration control matters. SEFA 3-2020 defines solid phenolic composite as a homogeneous organic-fiber-reinforced core. That composition limits its long-term tolerance to strong oxidizers. In contrast, for rooms that bleach-wipe daily, epoxy is the safer specification.
Stainless steel
Type 304 or 316 stainless is common at the accessioning centrifuge station and around biosafety cabinets. It disinfects easily and holds up to routine hypochlorite wipe-downs. The NIH Office of Research Facilities has documented that stainless can pit under continuous high-concentration bleach exposure, particularly in drains and traps (NIH ORF Trap Corrosion White Paper). So pair it with polypropylene drainage in the sink zone if the disinfection protocol runs heavy.
Cabinets, hinges, and pulls
Laboratory casework in a hematology lab should share the same clinical-grade base as the rest of the clinical lab: sealed edges, cleanable interiors, and hardware chosen for daily wipe-down. Our concealed euro-style hinges and flushed pulls tend to be the more cleanable choice. They avoid the crevices in exposed 5-knuckle butt hinges and knob pulls that can trap contamination. Please note, that is a OnePointe’s preference style, not a code-driven spec, so pick what suits the facility.
Biosafety and OSHA compliance
Every hematology lab in the United States operates under OSHA’s Bloodborne Pathogens Standard, 29 CFR 1910.1030. The design implications are concrete. First, a written Exposure Control Plan. Second, engineering controls that isolate or remove the hazard. Third, specific provisions for hand-washing, sharps disposal, and specimen labeling. In short, room layout has to make compliance easy. Our Division 12 specification guide covers the casework side of that compliance in more depth.
Compliance checklist matrix
The matrix below cross-references the compliance items most often flagged during CAP or OSHA inspections against the lab zone they land in and the hematology lab design decision that satisfies each item. Use it as a quick check against your drawings.
| Compliance item | Source | Primary zone | What the design has to do |
|---|---|---|---|
| Handwash sink accessibility | OSHA 1910.1030 | Every wet zone | Dedicated handwash sink per wet zone, not shared with chemical rinse. |
| Sharps container proximity | OSHA 2008 interpretation | Accession, analyzer, coag | Container within arm’s reach at every venipuncture / tube-processing point. |
| Eyewash travel distance | ANSI Z358.1 (referenced by OSHA) | All wet zones | Unobstructed 10-second travel path from every hazardous work area. |
| BSL-2 airflow | CDC BMBL 6th Ed. | Whole room | Room negative to corridor; project-specific ACH set by mechanical engineer. |
| Class II A2 BSC | NSF/ANSI 49 | Body-fluid / bone-marrow bench | Hard-ducted where possible; outside main traffic path; NSF/ANSI 49 certified annually. |
| Specimen temp control | CAP HEM checklist | Storage | Dedicated fridge / −20 / −70; continuous monitoring with alarm callout. |
| Reagent segregation | CAP HEM checklist | Analyzer bank | Reagent cart or chemical-resistant lockable base cabinet per analyzer. |
| Emergency power | NFPA 110 (facility scope) | Storage + analyzer bank | Every freezer, refrigerator, and 24/7 analyzer on emergency-power circuit. |
| ADA reach + knee clearance | 2010 ADA Standards §902, §308 | All benches | At least 5% of workstations at 30″ bench with 27″ clear knee. |
| Bloodborne pathogen training/PPE storage | OSHA 1910.1030 | Corridor entry | PPE storage between corridor and first wet zone; visible signage. |
Item cross-references above are the ones most often flagged during CAP hematology inspections; the full CAP HEM checklist runs to hundreds of items. Confirm your project’s specific requirements with your medical director and biosafety officer.
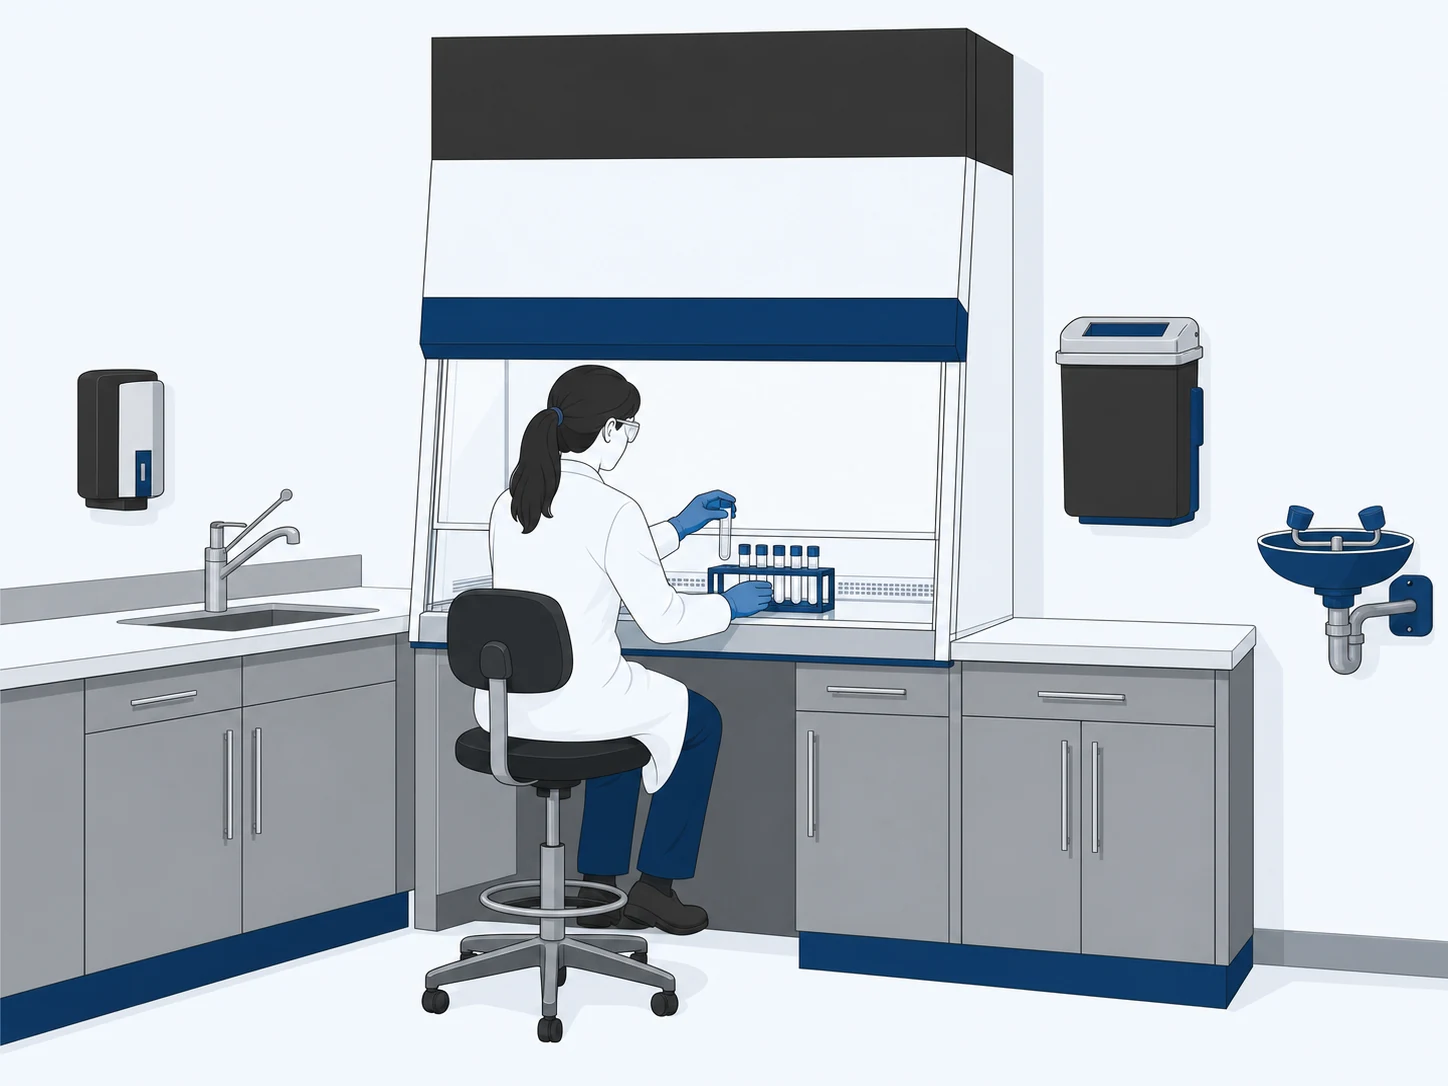
Handwashing sinks
OSHA 1910.1030(d)(2)(iii) requires readily accessible handwashing facilities in areas where staff handle blood. Typically, that means a dedicated handwashing sink at each work zone entry, one at accession, one at the analyzer bank, one at microscopy, separated from the specimen-processing sink to reduce cross-contamination.
Sharps containers
OSHA requires sharps containers to be closable, puncture-resistant, leak-proof, appropriately labeled, and located as close as feasible to the immediate area of use (1910.1030(d)(4)(iii)(A)). In practice, that means a mounted sharps container within arm’s reach of every venipuncture station, tube-processing area, and any bench where broken glass could occur (OSHA 2008 interpretation on sharps container placement).
Biosafety level
Clinical hematology labs handling routine patient specimens generally operate at BSL-2 under CDC and NIH guidance in Biosafety in Microbiological and Biomedical Laboratories (BMBL, 6th Edition). BSL-2 design elements that matter for hematology include a biosafety cabinet (Class II Type A2 is typical) available for aerosol-generating procedures, self-closing doors, an eyewash station within a 10-second travel distance, and sink placement near the room exit.
Ventilation
BMBL and the NIH Design Requirements Manual do not set a single universal air-change rate for clinical hematology, but 6 to 10 air changes per hour is a common design target for BSL-2 clinical labs. Directional airflow into the lab from adjacent corridors helps contain any aerosol release.
Specification guidance: what to write in Division 12 and Division 22
Once the zoning is right, the specification is what protects hematology lab design from value engineering. A hematology lab that leaves bench heights, casework grade, or utility rough-ins vague ends up with substitutions the medical director never approved. Here’s the level of detail your Division 12 (casework) and Division 22 (plumbing) sections should carry to defend the hematology lab design intent.
Bench heights and elevations
- Seated microscopy: 30″ or 34″ top depending on chair-vs-stool preference; leave 27″ clear at the knee for ADA compliance at accessible stations. See our Division 12 specification guide for the full language.
- Standing analyzer bank: 36″ top; deep enough for the analyzer footprint plus reagent cart plus tube-rocker in a single lane.
- ADA-accessible stations: 30″ top with 27″ clear knee, at 5% of total workstations, per 2010 ADA Standards §902 and §308.
- Coagulation bench: 36″ top; centrifuge on its own bench section, not shared with analyzer support.
Casework grade
- SEFA 8 steel casework for analyzer, accession, coag, and body-fluid benches — the chemical-resistant powder coat holds up to bleach and reagent contact.
- Drawer glide rating called out in pounds, not marketing tiers. Analyzer reagent drawers loaded with liquid inventory can exceed 75 lb; retail nominal ratings often assume dry files.
- Adjustable shelves and pull-out reagent shelves specified explicitly per table or island, not left as an allowance.
Utility rough-ins
- Outlets: continuous strip at 6–12″ o.c. above every analyzer bench, sized for the analyzer nameplate plus tube-rocker, reagent cart, LIS terminal, and printer.
- Emergency-power circuits explicitly listed by device — every freezer, every refrigerator, every 24/7 analyzer, and any centrifuge that supports STAT coagulation.
- Water: RO/DI tap within 6 ft of any analyzer whose IFU calls for it; verified line pressure and flow.
- Vacuum and compressed air: rough-ins matched to each analyzer’s install manual, not to a generic lab spec.
- Floor sinks and drain trays under any freezer that defrosts to condensate; trap-priming plan documented for any floor sink prone to drying.
Sink units and fittings
- Epoxy sinks specified drop-in or undermount. They will come as separate molded units. Don’t specify as “integral or integrated” to a phenolic or epoxy work surface.
- 316 stainless drop-in or sheet sinks for any decontamination station.
- Deck-mounted vs. wall-mounted faucet spelled out per station, with vacuum breaker where required.
Automation, LIS integration, and workflow at the analyzer bench
Modern hematology increasingly runs on automation lines: pre-analytic centrifuge and decapper, connected transport, primary and secondary CBC analyzers, and downstream slide-makers and stainers. The CAP checklist doesn’t dictate the physical layout of automation. However, it does set requirements that shape it.
First, HEM.30070 asks labs to compare results from multiple CBC analyzer sampling modes at least annually. HEM.30250 requires defined upper and lower reportable limits for every CBC parameter, with alternate methods available when a result falls outside the analytic range. HEM.30300 and HEM.30350 require independent verification when platelet clumps, giant platelets, satellitism, or unlysed RBCs are suspected. In room terms, the analyzer bench needs a reflex microscopy station close by, not across the room, and enough counter space to keep spare tubes, dilution reagents, and slide-making supplies within reach.
Interface work is where a lot of hematology lab design projects struggle. The CAP checklist doesn’t prescribe LIS validation in detail, but HEM.37830 and HEM.37860 require correct INR calculation and report checks across the analyzer, LIS, or manual path. In practice, that audit is easier when every analyzer has a nearby LIS terminal and a printed run log. So give each analyzer its own dedicated workstation position. Otherwise, a shared LIS island tends to bottleneck at peak load.
Ergonomics and staff flow in hematology lab design
CAP doesn’t set ergonomic requirements for hematology benches, but the workflow itself does. Microscopy at 100× for 300 fields per slide (HEM.34872), repeated across dozens of slides in a shift, is one of the more ergonomically demanding tasks in the clinical lab. First, a well-designed microscopy station needs adjustable-height seating. Second, a stable bench (ideally a phenolic top for vibration control). Third, task lighting that doesn’t clash with the microscope illuminator. Keep the monitor and slide storage within a comfortable reach envelope.
Similarly, technologists at the analyzer bench spend hours loading racks, releasing runs at the LIS, and swapping reagent packs. In practice, bench height should support both seated and standing work. Many facilities specify a 36-inch standing height with a rolling stool option, though preferences vary and lab directors should weigh in. Anti-fatigue matting at high-standing zones is a low-cost addition that generally reduces staff complaints.
Maintenance recommendations by zone and material
Hematology lab design intent survives only if the maintenance program keeps up with it. A hematology lab that gets a clean commissioning and then loses the maintenance cadence tends to drift out of compliance within 12–18 months. Here’s the baseline schedule that protects the hematology lab design decisions above.
Daily
- Bench surfaces (all zones): 1:10 sodium hypochlorite wipe on any surface that saw blood, followed by a water rinse to protect the resin.
- BSC (body-fluid / bone-marrow): front-opening airflow verification via built-in gauge; log any deviation for the certifier.
- Eyewash: visual check that access is unobstructed.
- Sharps containers: confirm none are at or above the fill line.
Weekly
- Casework: hinge and pull inspection; drawer glide function check on any drawer that stuck in the last week.
- Sink traps: run water in any floor sink or rarely used sink to keep the trap primed.
- Temperature logs: review fridge/freezer alarms for silent excursions.
Quarterly
- Eyewash: full flush test and logged.
- Analyzer service: vendor PM cycle aligned with reagent lot changes where possible.
- Ventilation: visual check of any hard-ducted BSC exhaust; note flow-monitor readings.
Annually
- BSC certification: NSF/ANSI 49 accredited field certifier; certificate posted on the cabinet.
- Sink traps and vents: inspection for corrosion. Trap corrosion is a documented failure mode in older labs and a common source of odors and cross-contamination.
- Emergency power: full load test on the generator that feeds the freezer bank.
- ADA compliance walk-through: confirm accessible stations still meet reach and knee clearance after any furniture changes.
- Casework recoat / touch-up: address any powder-coat wear at high-abrasion points (chair legs, wheel paths).
Compliance notes, how the standards line up
Hematology labs generally answer to at least five overlapping bodies. Each one owns a different slice of hematology lab design, and the way they interact is where most gaps show up in a survey.
CAP Hematology and Coagulation Checklist
The CAP HEM checklist is the practical driver. It covers workflow, storage, temperature monitoring, LIS integration, and reagent handling. Design implications appear in nearly every item that mentions physical space — zoning, storage temperature, reagent segregation, and specimen tracking.
CLIA (42 CFR Part 493)
CLIA classifies most hematology testing as high or moderate complexity and sets the personnel, quality-control, and proficiency requirements that CAP then audits against. Design ties in through workspace adequacy, environmental controls, and specimen handling paths.
OSHA 29 CFR 1910.1030 (Bloodborne Pathogens Standard)
1910.1030 drives the tangible design decisions: handwash sink accessibility, sharps container placement, PPE storage, biohazard waste segregation, and engineering controls. The 2008 sharps-container interpretation letter from OSHA is the reference for the arm’s-reach placement rule.
CDC BMBL, 6th Edition
BMBL is the airflow, containment, and BSC-selection reference. A typical hematology lab is BSL-2; BMBL sets the room airflow direction, PPE, and biosafety cabinet requirements.
NIH Design Requirements Manual
The NIH DRM is not code, but it is the most comprehensive published design reference for research and clinical laboratories in the United States. Bench heights, aisle widths, utility rough-ins, and lighting levels in this guide all trace back to the DRM.
SEFA 3-2020 (Work Surfaces) and SEFA 8 (Casework)
SEFA 3-2020 defines the chemical-resistance test panel for lab work surfaces, and SEFA 8 defines the casework quality classes. Both belong in the Division 12 spec by number, not by generic reference.
Five most common hematology lab design mistakes (and how to fix them)
Most of the pain we see on hematology lab design retrofits and second-generation builds traces back to the same handful of decisions. If you catch these on the drawings, you avoid most of the field rework.
1. Coagulation bench across the lab from accession
Problem: Heparin-monitoring aPTT samples have roughly a 1-hour window before the plasma has to be separated. A long walk between accession and coag blows that window on a busy morning.
Fix: Coagulation belongs adjacent to accession, with its own centrifuge in-zone. Don’t share a centrifuge with the analyzer bank.
2. Phenolic tops specified on analyzer benches to “save money”
Problem: Phenolic’s chemical class is enough for microscopy and dry work, but it isn’t reliably rated for the routine spills that happen at an analyzer bench: lysing reagent, sodium hypochlorite, and diluent all show up in the CAP failure data.
Fix: Clinical epoxy per SEFA 3-2020 on every wet-work bench. Reserve phenolic for microscopy and dry LIS review stations.
3. Biosafety cabinet in a doorway or traffic path
Problem: A BSC needs a stable air pattern at the front opening. Locate it under an HVAC diffuser, near a door swing, or on a cart path, and containment fails during use — which is exactly when it matters.
Fix: BSC in a low-traffic corner or alcove, at least 3 ft from any door, with no diffuser directly overhead. Verify airflow after commissioning.
4. Freezers left off emergency power
Problem: A 2-hour utility outage can void an entire hematology archive slides, blocks, or long-term serum. Even a partial outage can trigger CAP-reportable temperature excursions.
Fix: Every fridge, −20 °C freezer, and −70 °C freezer on the emergency-power branch, with continuous temperature monitoring and 24/7 alarm callout. Test the callout list.
5. One handwash sink for the whole lab
Problem: OSHA 1910.1030(d)(2)(iii) requires handwashing facilities that are “readily accessible” to employees. A single sink at the corridor end of a long lab doesn’t meet the intent, and it tends to double as a reagent rinse point, which the surveyor will flag.
Fix: A dedicated handwash sink in every wet zone, clearly labeled, not shared with chemical or specimen rinse duty.
Bringing it together
The hematology lab that runs well in 2026 is not the one with the most floor area or the flashiest automation. It’s the one where lab design enforces the CAP checklist. The accession bench holds coagulation samples at room temperature without a walk to the fridge. The microscopy bench sits three steps from the analyzer flag. The biosafety cabinet stays available without a workflow detour. The bench materials survive a decade of daily hypochlorite disinfection. These decisions traces back to a specific CAP, OSHA, CDC, NIH, or CLSI reference. And every one of them is easier to design in on day one than to retrofit at year three.
In short, OnePointe Solutions, we can help. If you’re planning a new build or a renovation and need help with furnishing the interior of the lab with the appropriate materials per your experiments and cleaning regimen, give us a call today. We can walk you through what works, where they may be some concern and of course what to certainly avoid.
Author: OnePointe Solutions Lab Design Team
Primary sources cited: CAP Hematology and Coagulation Checklist · OSHA 29 CFR 1910.1030 · CDC BMBL 6th Edition · NIH Design Requirements Manual · SEFA 3-2020 Work Surfaces · NIH ORF Trap Corrosion White Paper